Showing posts with label recipe. Show all posts

Recipe - Cheesy Potato Soup

I am not a soup person. Well, let me clarify that. I am a lover of noodle soups (which is very big in the Vietnamese culture), but I am not generally a fan of soupy soups. You know, the kinds you find in cans in the grocery stores...not my thing. I want body and texture to my soups, not the watery bleh-ness that makes me think I’m eating a bowl of savoury tea.

That being said, the boyfriend loves soup. He could eat soup morning, noon and night and be happy as a clam. I think I found a solution to the great soup divide, and it all came about because I had a bunch of potatoes and carrots that needed to be used, and used in mass quantities. This soup has the substance I need with its chunks of vegetables and potatoes, as well as the warm comfort that the boyfriend likes from a hearty bowl of old fashioned soup. I like the simplicity of this recipe that yields such a deep flavour, from hardly any work at all. In fact, the basic ingredients when combined in this bowl of awesome, all lend such distinct flavours that it tastes much more complicated than it really is. Just be prepared for a lot of chopping (I hate chopping).
 Cheesy Potato Soup

2 Tbsp oil
1 onion, diced
3 carrots, diced
1 pound potatoes, peeled and cubed (about 6 large)
4 Cups, chicken broth (low sodium)
3 Tbsp butter
3 Tbsp flour
2 Cups, milk
2 Cups, grated cheddar cheese + more for garnish
Salt and pepper to taste
*Optional: chilli powder and garlic powder


1.       Heat oil in large soup pot and cook onions and carrots until softened.
2.       Add potato and chicken stock (should be enough stock to cover everything, if not, add more or water).
3.       Bring to boil and cook until potatoes are tender, approx. 20-25 minutes.
4.       In separate pot, melt butter over medium-low heat. Once melted, add flour to form a roux, whisking to combine. Cook for about a minute.
5.       Add milk to roux slowly, whisking constantly to smooth out any lumps. Continue to heat while whisking until mixture thickens, approx. 5 minutes. (If mixture does not thicken, add a bit more flour).
6.       Once it reaches the desired thickness, remove from heat and stir in grated cheese until creamy and smooth.
7.       When potatoes are tender, pour the cheese mixture into the soup pot, stirring well to combine. Heat to simmer and cook until thickened. Season with salt, pepper and garlic powder to taste. (For an extra kick, add chilli powder).
8.       Sprinkle extra grated cheese on top and serve with crusty bread.

Makes 6 large servings. Freezes well.

Recipe - Kale Chips


One of the reasons that I’ve been quiet for the past while is because I decided to go on a health kick for eight weeks (this being week three) and that meant getting used to a few schedule changes to accommodate my recent lifestyle. Now that I’m getting more accustomed to my routine, I’m hoping that I can get back to writing here more often (and take you through my extensive backlog of restaurant reviews, but also a few recipes that I’ve picked up along the way).  

I’ve been trying to eat healthier, and one of the things that I have been having difficulty with is making sure I eat plenty of fruits and vegetables every day. Don’t get me wrong, because I do eat lots of greens, but I’ve been trying to eat more – and trying to find new and exciting ways to eat them. Let me tell you, I have found the Holy Grail of vegetable recipes. It has changed my life and I’m not afraid to admit it, left me with a newfound obsession. I can’t stop making/eating/thinking about them.

Kale Chips. Chips made from kale. Kale. That is like chips. Whaaaat? Sounds weird, I know. You may even be like me and think it’s a hoax to make you buy a bunch of kale just to get it into your house. No, friends, this is the real deal. The bomb. The shizzle. The best snack I’ve eaten in a long time. This simple method of preparing it has turned what is an unpleasant, bitter, tastes-healthy-so-it-must-be-gross, leafy vegetable, and turned it into a lighter than air, crisper than potato chips, you-can’t-eat-just-one, delight. In fact, each time I make this recipe, whole bunches of kale are devoured at a time. When have you ever said that? When have you willingly sat and ate an entire bunch of kale in a sitting – not because you have to, but because you want to? The first time I made these, I served them as a side to a “cheesesteak” sandwich, and the boyfriend looked at me with scepticism in his eyes. After his first bite though, I had to fight him to get the last few off the plate. This is the magic of kale chips, and I’m about to blow your mind with how easy it is to make these delicious beauties.

To start, wash your kale and then dry it very very thoroughly. I go to the extreme and run it through the salad spinner and then pat the leaves dry on top of it. You don’t want any moisture on it at all, to ensure that they’ll be nice and crispy once they’re baked. At this point, you can preheat your oven to 350.

A leaf at a time, cut out the middle vein (is it called a vein? I call it a vein) and keep the leafy part off the stem. You can cut it down into smaller pieces if the leaves are big, but keep in mind that they’ll shrink significantly in the oven. Toss everything into a bowl and drizzle the olive oil over the leaves, then use your hands and massage the oil into the kale – making sure you get every nook and cranny. If you don’t want to get your hands dirty, you can also put the kale into a baggy and drizzle the oil into it, then squish it around in the bag. Once all the kale has been oiled, spread them out onto baking sheets without crowding them – I find one bunch of kale usually takes up two normal sized sheets pre-baking, but they shrink to almost half their size after they're done. 
Pop the sheets into the oven and bake for between 15 and 20 minutes. You want the kale to be crispy, but once it starts to brown too much, it will taste charred and the bitterness returns. Just watch it near the end to make sure, it’s a quick jump from crispy to burnt. Once they’re baked, remove the pans from the oven and sprinkle salt to taste. I don’t have an exact measurement, but I typically use sea salt, and find that a dime sized amount in the palm of my hand is perfect in giving me the saltiness that I like.
The beauty with these chips is that they taste so good, you feel like you’re getting a treat. The crunchy, salty combination cures any cravings you may have for unhealthy snacks, and dipping them in ketchup makes you feel like you’re having fries! They’re also extremely versatile, so you can flavour them any way you like – add chilli flakes, or roasted garlic, massage in some vinegar with the oil for salt and vinegar chips...the possibilities are endless, but the results will still be delicious. 

Try them. Love them. Eat your weight in kale and find yourself inexplicably talking about them wherever you go, to whoever will listen. I promise you’ll be surprised at how addictive they are.

Recipe: Kale Chips
1 bunch kale
1 Tbsp olive oil
Salt to taste
Optional: other seasonings to taste
Optional (but delicious): ketchup to dip

1.       Preheat oven to 350.
2.       Wash and dry kale thoroughly.
3.       Remove stem and middle vein from each leaf. If leaf is still too large, cut into smaller pieces.
4.       Place kale into bowl and drizzle oil over top. Using hands, massage oil into each leaf, making sure all surfaces are lightly oiled.
5.       Place on baking sheets, making sure not to crowd.
6.       Bake for 15 – 20 minutes until crisp.
7.       Remove from oven and salt/season to taste.
8.       Eat one. Moan because it is so good. Hoard the rest and don’t share.

Will store in airtight container for two days. If you’re not eating them immediately, store in the airtight container or else they start to go soft.

Recipe - 5 Minute Cake

Since receiving an email with this recipe a while back, I have been curious if it would actually make an edible chocolate cake in the same amount of time that it takes me to gather the ingredients. Sure, I can bake a cake from scratch, or use a boxed mix – but sometimes I just want the taste of something chocolate-y without having the temptation of a whole family-sized cake staring at me.

I decided to test the waters and see if this actually worked – and I am pleasantly surprised to report that yes, it does work, and no, it does not taste horrible. I accidentally over-mixed it, so the end result was denser then I would have liked it, but I think if I was more careful, it would have turned out much better. The taste is fudgy and not overly sweet, and the addition of the chocolate chips gave it an extra bit of pizzazz. I was watching it carefully as it cooked in the microwave and was worried since it rose to twice the size of the mug, but once it settled it only filled about half of my regular sized coffee mug. I will say that it made my house smell absolutely divine as it was cooking and the minute or so of waiting was torturous to my impatient self.
This cake tastes much better while it is warm because once it cools it begins to harden – again, probably my fault because I mixed it too much, but something to watch out for. You could probably cook it for 2 ½ minutes for more of a molten lava cake with a gooey middle instead. I cut it in half to share with the boyfriend as a quick snack while we watched TV, and served it with chocolate/cherry frozen yogourt, a squirt of whipped cream and a maraschino cherry on top. It made something so simple seem a bit fancier, and I felt less guilty for serving up something so ridiculously effortless. So if you’re looking for a quick dessert for one or two people, this is about as quick (and easy) as you can get.


5 Minute Cake

4 Tbsp flour
4 Tbsp sugar
2 Tbsp cocoa
1 egg
3 Tbsp milk
3 Tbsp oil
1 tsp vanilla
1 Tbsp chocolate chips (optional)

1.       In a mug, mix flour, sugar and cocoa.
2.       Add egg, milk, oil and vanilla. Mix until combined, but be careful not to over mix.
3.       Fold in chocolate chips if using.
4.       Microwave on high for 3 minutes. Cake will rise over the mug – wait until it stops rising and sets in the mug before removing.
5.       Top with ice cream, whipped cream – whatever you want!

Makes 1 mug cake – can serve 2 if you feel generous and want to share.

Recipe - Yum Drops

I’m one of those people who always craves certain foods at certain times, and shortly after it’s satisfied, I’m onto the next craving. I remember reading somewhere once that a typical craving lasts 30 minutes on average, and I snorted reading that because my cravings have been known to linger for days, if not weeks.

They’re never simple cravings either. My current one has been for something salty-sweet, but I didn’t quite know what I wanted. My co-worker recently told me about a strange yet intriguing treat she had tried while traveling out West and my brain went into overdrive. These chocolate-peanut butter-chip concoctions definitely piqued my interest and I haven’t been able to stop thinking about them since she mentioned how good they were.

I decided I would make them as a sweet goodie for the roomie’s birthday since she said she didn’t want a typical cake. To be honest, as I was making them, I had a brief moment of “what am I doing?” since I used the basis of the recipe but fiddled around a bit with the ingredients I had on hand. The end result was nothing short of spectacular. Admittedly, the ingredient list sounds like a strange combination, but trust me when I say that these are delicious. The mixture of flavours and textures give it more depth than a cookie or a chocolate bar, and the combination of sweet and salty dance on your tongue. The beauty of this recipe is that it is so easy (one bowl, no baking, and super fast!) and so versatile, plus you can add virtually any ingredient you want to it. I’m pretty sure no matter what you do to it, it would still come out fantastic. Next time I make these, I think adding chopped nuts or raisins or coconut would also be good – the possibilities are endless, but the deliciousness will still be there no matter what you do!

As a final note that has nothing to do with the actual recipe, the actual naming of it caused quite the debate around these parts. My co-worker said that these were nameless, so I took the liberty of giving it a name for this post. Numerous names were tossed around (and viciously shot down) until we came up with the perfect, most simple way to describe exactly what these are. 

If you try them, let me know what you think/what you added!

Yum Drops

1 300g bag of chocolate chips
1 300g bag of peanut butter chips
1 300g bag of butterscotch chips
2 regular sized Skor bars
Regular potato chips, crushed
Popcorn, popped

1.       In microwave safe bowl, combine chocolate chips, peanut butter chips, butterscotch chips. Melt in microwave, stirring often. Be careful not to burn.
2.       Coarsely chop up Skor bars and stir into melted mixture.
3.       Start adding crushed potato chips and popcorn by the handful and toss with the melty goodness. (I find using my silicone spatula sprayed with a bit of Pam at this point helped make things not stick while I mixed.)
4.       Once you have reached your desired combination of salty to sweet (keep tasting...and try to stop yourself from eating the whole bowl as is), spoon by tablespoonful onto waxed paper and let set. You’ll find that the drops start to set fairly quickly, but if you want to speed up the process, slide the wax paper onto a cookie sheet and pop into your freezer for a few minutes. Store in an airtight container.

Makes approximately 30 drops.

*Note: I had a bit of the mixture leftover, but not enough to make a full drop, so I took full potato chips and spread the chocolate mixture on top and let it set. A little more salty, but oh so good. It's another option if you don't want to make them into drops and like a bit more salt with your sweetness. Call them Yum Chips!


Recipe: Banana Muffins with a Twist

Do you ever have one of those horrible days at work where nothing will make you feel better aside from coming home, curling up on the couch with something carb-ilicious and a cold Diet A & W root beer to watch reruns of Jon & K8te (pre-divorce)? No? Oh, well...me neither. However, for those of you that have those kinds of days, these muffins will make you feel better. They’re like the food equivalent of getting a hug from your best friend. Who is wearing the cosiest sweater. Who smells like banana muffins. Is it weird I want my best friend to smell like a banana muffin? Probably best you don’t answer that.

Anyways, I needed to bake because my bananas were looking pretty sad, but I wanted something different and decided that a crumbly streusel-like top would be the best answer. These actually turned out amazing – the crumble top adds a nice crunchy texture to the soft, moist muffin. And we all know how much I love my crunch.

This recipe makes 12 large muffins. Just as an FYI, I packaged the leftovers in an airtight container and they kept well for a couple of days until we ate them all. The muffins remained moist, but the crumble top lost its crunch (but still tasted good).  Try these the next time you have a bad day. They’re so magically delicious, you'll have no choice but to feel better.


Banana Muffins with a Twist

1 ½ cups flour
1 tsp baking soda
1 tsp baking powder
1/2 tsp salt
1/4 tsp cinnamon
1/8 tsp nutmeg
2 bananas, mashed
4 Tbsp vanilla yogourt
3/4 cup sugar
1 egg
1/3 cup oil
1 tsp vanilla

Crumb Topping
1/4 cup packed brown sugar
2 Tbsp flour
1/4 tsp cinnamon
1 Tbsp butter

1.       Preheat oven to 375 degrees. Grease or line 12 muffin cups.
2.       In a large bowl, mix first six ingredients and set aside.
3.       In separate bowl, mix together bananas, sugar, egg, oil and vanilla. Stir in dry ingredients until just moistened and spoon into muffin cups.
4.       In small bowl, mix together crumb toppings, working butter into dry ingredients until evenly incorporated and makes a grainy mixture. Sprinkle topping evenly over muffins.
5.       Bake for 18-20 minutes until toothpick inserted comes out clean.

Makes 12 muffins.

Recipe: Peanut Butter Cookies with Peanut Butter Cups

As the holidays draw nearer, I find myself on a baking kick trying to find some good cookie recipes to add to my repertoire. This particular recipe was inspired by walking down the candy aisle at the store and stumbling across a box of mini peanut butter cups. My brain immediately jumped to the thought of me eating them in a bowl of milk like cereal, and I had to stop and tell myself that it probably wasn’t one of my most brilliant ideas. However, they were small enough that I could use them in a baking project, and so I happily justified purchasing them. 
My original intent was to make peanut butter thumbprint cookies with a peanut butter cup filling the centre, and I set out to find a simple recipe that would showcase the peanut buttery goodness that was coming. This post so far is short and I’ve already said “peanut butter” so many times, I’m going to be peanut buttered out by the end of this. See? I did it again. Peanut buttering myself into a sticky oblivion by my excessive use of peanut butter. Gets addictive, I tell you. I may have a problem.

Anyways, back to the cookies. This recipe consists of a simple five ingredient list, six including the chocolate cups. I have always preferred peanut butter cookie recipes without the flour because I like them to be a little crispier than other cookies. The original recipe I found yielded 24 cookies, but I was too lazy to measure out half my jar of peanut butter so I doubled the recipe, used the whole jar and made 48 cookies.

I used a full 500 gram jar of organic peanut butter – the kind where the oil separates from the peanut butter and there are no other ingredients except for peanuts. I find when the cookie recipe calls for peanut butter as the main ingredient and there is no flour, it is better to splurge and use the organic kind. There is some kind of magic that makes my cookies come out better when I use the peanut butter where the oil has separated. Don’t ask me why, because all I know is the cookie fairies make my cookies turn out perfectly every time.
The other good part about this recipe is that everything is done in one bowl, and mixed by hand with a wooden spoon. No need to bring out the mixers, or multiple bowls. This is simple, pure, peanut butter cookie roots we’re getting back to, people. 

Using my trusty cookie scoop, I spooned out tablespoon sized balls of dough and set them about two inches apart on the baking sheet – 12 per sheet – and prepared two pans, flattening each ball as I went. Using the handle of the wooden spoon, I made an indentation in each ball to get the “thumbprint” and popped them into the oven for 12 minutes. While they were baking, I took the peanut butter cups and cut them in half so you can see the chocolate coating with the peanut butter insides and set them aside. The cookies were ready when I noticed the golden edges because I wanted a crispier cookie. Working quickly while they were still warm on the sheet, I used the handle of the spoon to push the indent down again since the cookies puffed up a bit while they baked, and placed one half of the peanut butter cup into each cookie. Once the 24 cookies were done, I transferred them to wire racks to let them cool and let the chocolate melt into the tops of the cookies.
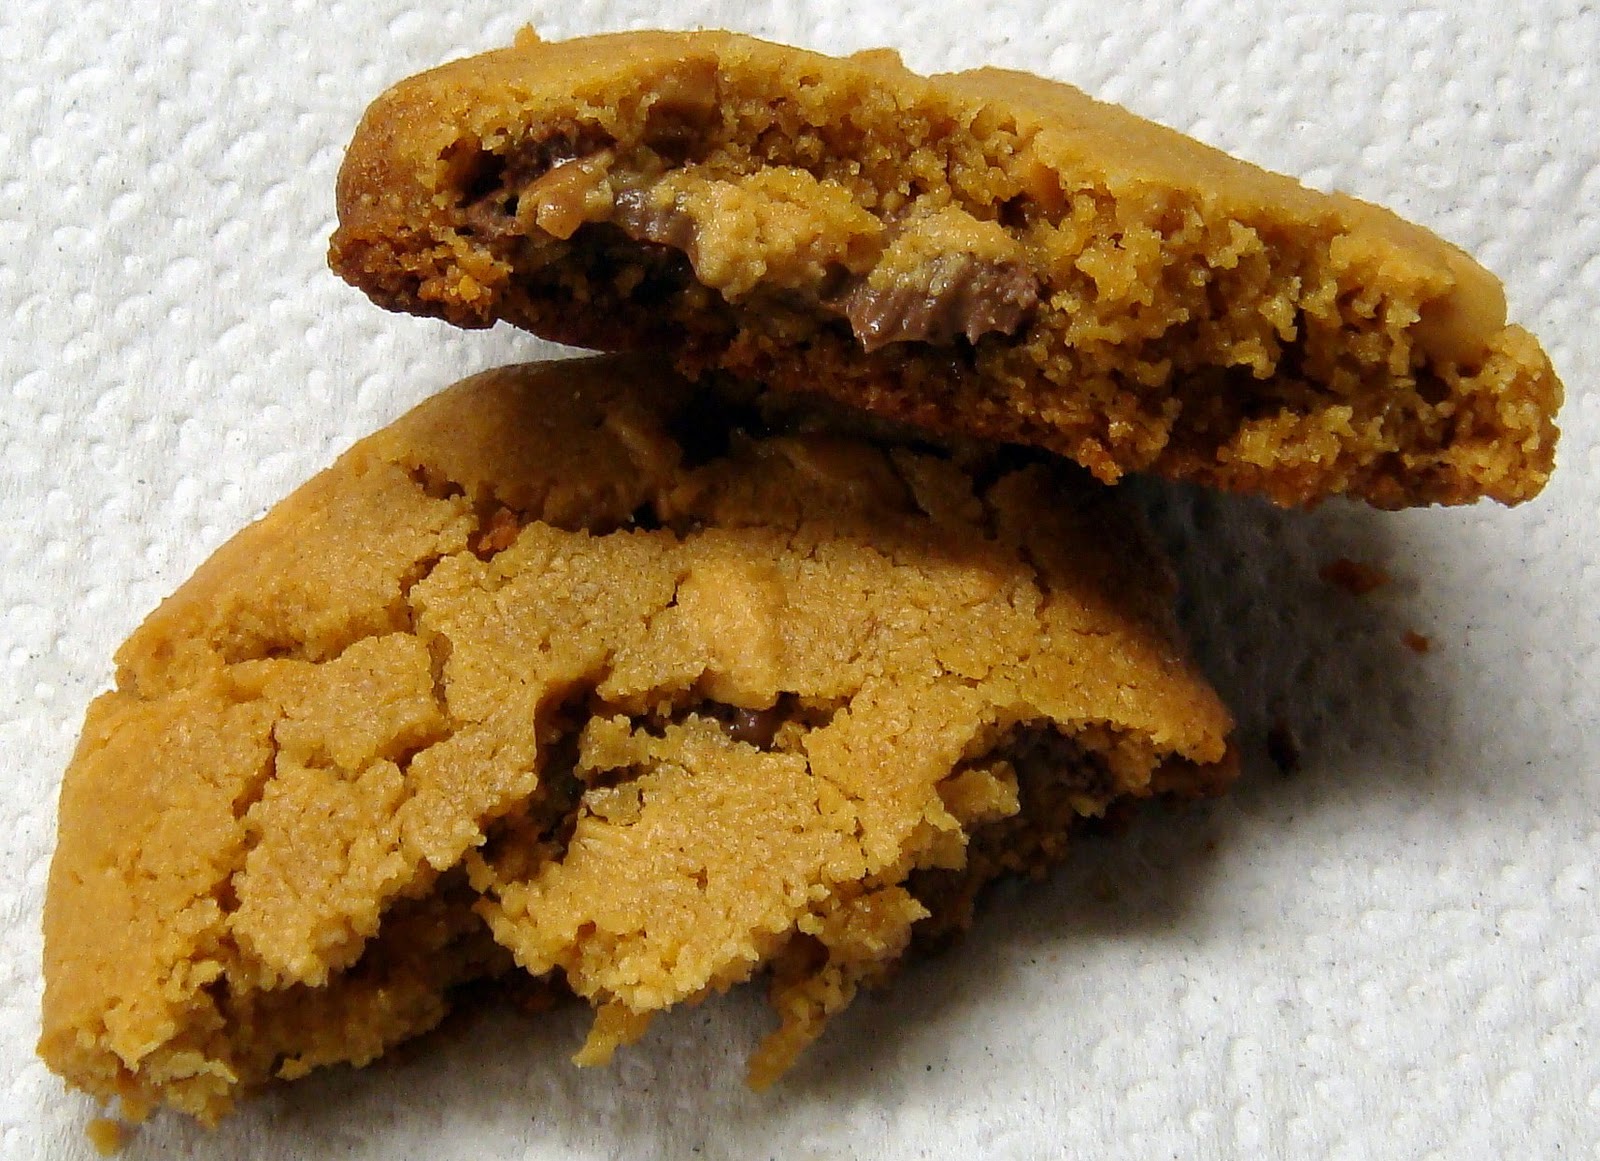
The second batch I wanted to do something a little different so I flattened the pre-scooped balls and placed half a peanut butter cup inside. I then rolled the balls with my hands, covering the chocolate completely and placed it on the cookie sheet. Once all the cookies had chocolate inside and were sitting on the pans, I flattened them slightly with the back of my spoon and placed them in the oven. This time, I baked them for only 10 minutes because I wanted them to be slightly softer than the first batch so the inside was gooey with the chocolate. They came out with crispy edges but a softer middle, so when you broke them in half while they were still warm, the chocolate oozed into a ganache-like texture.

If you feel like peanut butter and prefer cookies that are a little crisp rather than soft and chewy, try this recipe out. They are extremely rich because of the amount of peanut butter used, but are pretty to look at and make your house smell divine as they are baking. Although I added the peanut butter cups because I had them on hand, these would take equally as delicious being baked without them, or even with chocolate chips. Either way, if you love peanut butter, you’re going to love these cookies.

Neurotic Peanut Butter Cookies with Peanut Butter Cups
1 500g jar of organic peanut butter (only ingredient listed should be peanuts)
1 ½ cups sugar
2 eggs, lightly beaten
1 tsp baking soda
½ tsp salt
24 mini peanut butter cups, halved


1.       Preheat oven to 350.
2.       In a large bowl, combine peanut butter, sugar, eggs, baking soda and salt. Mix by hand until combined.
3.       Drop by teaspoonful onto cookie sheet, approximately two inches apart. 12 to a standard cookie sheet.
4.       For thumbprints: Using the end of a wooden spoon, make indentation in centre of each cookie the size of the peanut butter cup.
For chocolate centres: Flatten each ball of dough and place peanut butter cup half into centre of each. Roll into ball until chocolate is completely covered by dough.
5.       Bake 10-12 minutes until edges are golden.
6.       Remove trays from oven and transfer cookies to wire racks for cooling.
For thumbprints: Use spoon to recreate indentation as cookies will have puffed while baking. Quickly place a peanut butter cup half into indentation before transferring cookie to wire rack for cooling.

Makes 48 cookies.

Recipe: Banana Chip Cookies with Crystallized Ginger

I love to be in the kitchen. The process of throwing ingredients together to develop and create something delicious gives me a sense of both calm and pride. Although cooking is my hobby, baking is where my passion lies. The fact that I have such a strong love for sweets probably plays a key role in this. Despite my love for the art, I find I only bake recreationally for a few specific reasons:

1.       I have perishable items in my pantry/fridge/cupboard that need to be used. Fruit and milk are usually the main culprits.
2.       I have the oven on because I’m baking something else and feel it would be a waste not to use said oven if it’s already preheated.
3.       I’m meeting someone new or going to someone’s house. Sometimes both happen at the same time!
4.       I’m watching a TV show, movie or sporting event and I can’t handle the stress. I have been known to whip up many a batch of cookies during playoff games or horror movies.
5.       I’m too lazy to go to the store to buy cookies because that means changing out of my pyjamas.

Last night was a combination of a few of those reasons, but mainly it was because I had the oven on already and there were some bananas that were begging to be baked into a tasty bite-sized treat. The only problem was that I only had one lone egg in my fridge, a very small amount of flour and an even smaller amount of butter. I started scouring the numerous food blogs I have bookmarked and came across a recipe that claimed to be a cross between banana bread and chocolate chip cookies, but with candied ginger added.

Feeling particularly adventurous (and having a large container of crystallized ginger that I wasn’t quite sure how to use up before it started to harden), I dived into the recipe realizing that I was going to have to tweak it significantly: first off, I had two sad-looking bananas and wanted to use them both up even though the recipe only called for one. So in both bananas went. Second, the recipe called for two lightly beaten egg yolks. There were two problems with this: 1) I only had one egg, and 2) I was feeling too lazy to actually beat the egg before I added it to the recipe. Yes, I realize that’s pretty lazy, but hey, it was 10 at night and I saved myself from using an extra bowl that I’d have to wash later! So in went the whole egg. The original recipe also called for a half cup of white sugar and a half cup of brown sugar, but I decided that by doubling the bananas I had enough sweetness, so I only added the half cup of brown sugar. Finally, I had about a cup of carob chips that I wanted to use because they are a healthy alternative to chocolate chips and these were somewhat healthy cookies. The fact that the bag was already open and I didn’t want to open a new bag of chocolate chips to only half use may have also been a small factor in my choice to use carob; it just sounds better when I say I wanted to be healthier. 

Meanwhile, back at the mixing bowl, I got to thinking that I didn’t particularly feel like cookies. So I purposely over-mixed the batter a bit to make the end result denser. I wanted them to come out of the oven more scone-like so you could add a bit of butter for some extra richness. After mixing it all together, I used my trusty cookie scoop (a fabulous investment if you want uniform cookies) and made exactly three dozen cookies of the exact same size. I was impressed – usually the end few are too small or there are extra bits here and there from scraping the bowl, but no, this made exactly 36 tablespoon-sized cookies.
The cookies from the original recipe spread while they baked into perfectly round, flat cookies. Mine kept their mountainous shape from when I dropped them onto the sheet and did not spread at all, which was exactly what I wanted. The first batch I made I left in for 14 minutes, which was the minimum time the recipe called for, but I found that the bottoms burnt. I adjusted to 12 minutes for the second batch and was happy with the golden colour that turned out. The cookies themselves were moist and soft on the inside with a bit of chewiness to the edges. Even though I had cut the original amount the recipe called for by half a cup, I found were too many chips and would probably cut it down to half a cup next time. The ginger added an interesting touch to the banana, but was not as overpowering as I thought it would be. I am glad I added the extra banana to give it a more natural sweetness and a stronger banana taste.
My tasting panel consisted of the roomie, the boyfriend and a number of co-workers, and the recipe was well received by all. According to the recipe calculator on Spark People, each cookie was about 100 calories and had four grams of fat – much better for you than a typical chocolate chip cookie which is around 140 calories with seven grams of fat. I really liked this recipe and think that the flavour combination of banana, chocolate and ginger work perfectly together. I would absolutely make these again, but would perhaps make them bigger and pass them off as scones. Paired with a hot cup of tea and warmed with some butter, these would make a great afternoon snack.   

Loosely adapted from Piece of Cake, these are Neurotic Banana Chip Cookies with Crystallized Ginger

2¼ cups flour
1 tsp baking soda
1 tsp salt
¼ tsp cinnamon, ground
½ cup brown sugar
½ cup unsalted butter, melted and slightly cooled
1 egg, large
1 tsp vanilla
2 bananas, mashed
1 cup carob chips
½ cup crystallized ginger, minced

1.       Preheat oven to 375°F with oven rack set to the centre position.
2.       Mix flour, baking soda and salt in one bowl and set aside.
3.        In a separate bowl, mix sugar, melted butter, egg and vanilla until well blended.
4.       Stir in the mashed banana.
5.       Stir the wet ingredients into the dry until mostly mixed then fold in the chips and ginger.
6.       Drop by tablespoons onto baking sheets, 12 per sheet.
7.       Bake one sheet at a time for 12–16 minutes, or until brown. Do not overbake.
8.       Cool completely before storing in an airtight container at room temperature.

Makes 36 cookies.